Tag Archives: photography

Fruit Pizza

fruit pizza 2

My attempt at being healthy has failed me. It’s been a long time since I can remember being excited to eat well. Actually, to be fair, I can’t remember a time I was ever excited to eat well. Sure, I force myself to eat apples as a mid morning snack while at work. Sure, I’ll eat almonds and rice cakes in the afternoon, but if you put a bag of peanut M&M’s in front of my face, I’d choose them every single time over the healthy alternative. That’s just who I am. I can’t hide it.

So you’d imagine my surprise when my mother-in-law made a fruit pizza while visiting us a few weeks back. I took one bite and thought I’d gone to heaven. (Just so you know, I’d never tasted the likes of the fruit pizza…) Sister quickly pointed out that the crust of said pizza was made of…sugar cookie dough.
Are you kidding me?
Is there anything more brilliant?
Cookie dough as crust.
I was hooked.
bberry fpizza dip
So the other day, I set forth to make this glorious pizza. And you’ll be happy to know that I snacked on the fruits while making it! I know, total insanity. I even went so far as to chop up extra strawberries to eat with cereal.

If you feel the need to be naughty but feel like you’re being healthy because there’s the slightest bit of fresh fruit involved…then this recipe is for you.

Fruit Pizza

1 pkg sugar cookie dough (16.5 oz), softened
1 pkg cream cheese (8 oz), softened
1 cup powdered sugar
1/3 tsp vanilla
1/2 cup apricot jelly (or apple jelly)
1/4 cup water

fruits: amounts vary to your own personal liking
1/2 cup sliced fresh strawberries
1/2 cup fresh blueberries
1/2 cup diced fresh peaches

To make:
Heat oven to 350°F.
Grease 12-inch pizza pan or spray with cooking spray.
Press softened cookie dough into the pan until it forms a crust.
Bake 15 to 17 minutes or until golden brown.
Cool pizza completely, about 30 minutes.

Meanwhile, mix cream cheese, powdered sugar and vanilla with a mixer on low speed until thoroughly combined. (Feel free to taste test to make sure.)
*Heat jelly over low heat, adding water. Bring to a rolling boil. Set aside.
Spread cream cheese mixture over cooled crust.
Spread apricot jelly/water mixture on top of cream cheese mix.
Arrange fruit to top it off.
Chill for an hour.

Store in refrigerator.

*You can omit this step if you like and just spread the jelly over the cream cheese, but I wanted a slightly less thick version.

Now you can almost feel good about your dessert choice.

Almost.

21 Comments

Filed under kmslat, sweet nothings

Camden Michael

It’s certainly been a while since I’ve visited this place. The last month has flown by like I never could have imagined. Getting ready for a baby is not exactly an easy task. Actually, the mental part is far more daunting than you could ever imagine. The gaining weight part was easy. It was everything else that was so hard to handle.

But…like every other soon to be parents, we did manage to handle it.
We still are handling it (just with a lot of help from family…)

And here we are- with an 18 day old little boy that has totally rocked our world. From the moment I heard his first cry, I was in love. Didn’t even know that was possible…to love something/someone you’d never met. But it is. And it’s amazing.
Terrifying, but the most wonderful thing ever.

Some of you have seen pictures, his name…so forgive me for resharing all of this, but it’s kind of nice to be able to post it all here so that I can look back years to come and relive this little stuff.

So here he is. Our beautiful baby boy-
Camden Michael.
born 7/8
6lbs, 13 oz.

052

11 days old (b)

And if you haven’t noticed…I am, in fact, totally smitten.

21 Comments

Filed under kmslat, sweet nothings

Sneak Peek: the nursery

You’ll have to forgive me for including some non-food related posts on to this little blog, but some of my most recent food making attempts have turned out less than stellar. 

As I mentioned a few weeks ago, the nursery was under way, but things were still far from done and nothing had been photographed.  Well, it’s still not completely finished, but I did manage to snap a few select shots last night.  These are more or less just the accessories, but honestly, these are my favorite features of Baby O’s soon to be room. 
owls by shutterboo
These owls are honestly just about the sweetest things I’ve ever seen. I made the decision to include owls a while back…not really sure how or why owls became a pseudo theme for the room, but they did. And these little fellas make me realize I made the right choice.
These little guys were handmade by a very dear friend.

baby o's nursery

The raindrop print I found in another nursery online and I instantly became obsessed. I made a rainy day mobile to complement the print, but it’s not hanging so you’ll have to trust me when I say it’s cute. And did I mention, handmade? By me? I know. Nuts, right?

049
And lastly, the family photos. I wanted our little guy to be surrounded by the people who will love him most in the world…and yes, that includes our dogs, or rather, the puppy versions of Libby and Justice. The photos took up a ton of wall space, but I couldn’t be happier with the finished product.

Now, just a few more weeks until Baby O will officially be here – hopefully loving this room as much as we do.

14 Comments

Filed under kmslat, sweet nothings

blackberry ice cream

Last summer, I made my first attempt at blackberry ice cream.  Homemade blackberry ice cream.  Lucky me…I just happened to have an ice cream maker that I’d received for a wedding gift several years back.  Of course, I’d never taken it out of the box, but that’s beside the point.  The first attempt at ice cream turned out well.  Unfortunately, I didn’t photograph it…therefore, I didn’t blog about it.  Truth be told, maybe that was a good thing.  Because it gave me something to do this Memorial Day weekend.  You know, gave me an excuse to make and eat some stinking good ice cream.

blackberry ice cream

Truth is, it wasn’t terribly hard to make. And remember, if I can make it, anyone can make it.

blackberry ice cream
ingredients:
2 pints fresh blackberries
juice of 1/2 lemon
1/4 cup sugar

1 1/2 cups half & half
1 cup sugar

5 large egg yolks
1 1/2 cups heavy cream

equipment needs:
fine mesh strainer
ice cream maker

directions:
Add blackberries to medium saucepan, adding 1/4 cup sugar and juice of 1/2 lemon. Cover and cook over low heat for 20-25 minutes.
Drain using the fine mesh strainer, pressing the berries until as much juice as possible has been extracted. Set juice aside.

Next, heat half & half and the remaining 1 cup sugar in a separate sauce pan over low heat. Turn heat off once mixture is totally heated through.

In a separate bowl, add heavy cream. Set aside.

Beat egg yolks until yolks are pale yellow and slightly thick. Temper the yolks by drizzling 1 1/2 cups of half and half/sugar mixture, whisking constantly. Next, pour the egg/half & half mixture back into the saucepan with the rest of the half & half mixture. Cook over low to medium-low heat until the mixture is thick. Stirring constantly. No really, keep stirring.

Drain the custard mix using the fine mesh strainer. Pour into the heavy cream. Stir to combine.
Add blackberry juice to the cream/custard mixture and stir well.

Chill mixture completely, then follow your ice cream maker instructions.

See, easy.
bberry diptych

5 Comments

Filed under holidays, kmslat, sweet nothings

Getting the nursery ready

Things are definitely in the home stretch with this pregnancy.  Today I hit the 34 week mark.  Yeap, horrifyingly close.

We’re also in the home stretch of finishing up the nursery.  And while I would love to post some pictures of it, I haven’t exactly taken any.  So, I decided to at least share a little idea of one of the things that will be in the nursery- family photos. Or rather, young photos of the soon to be grandparents and well, Ashley and me.  I haven’t gotten all of the photos in yet, but here’s what I have so far:

ashley at 3
{that’s Ashley at 3}

Cute katie (what happened)2
{yeap, that would be me…also at 3. should I be worried that ashley and i had the same haircut?}

pop pop
{my dad…who I am now referring to as pop pop}

momma lyn
{and my mom…in what appears to be one of the cutest and most creative outfits I have ever seen}.


I promise to post photos of the actual nursery soon…guess I might want to finish it first.  And good news…I actually baked the other day.  And took photos of it! Stay tuned, I may actually have a food post soon!

xoxo-

14 Comments

Filed under kmslat

Blondies

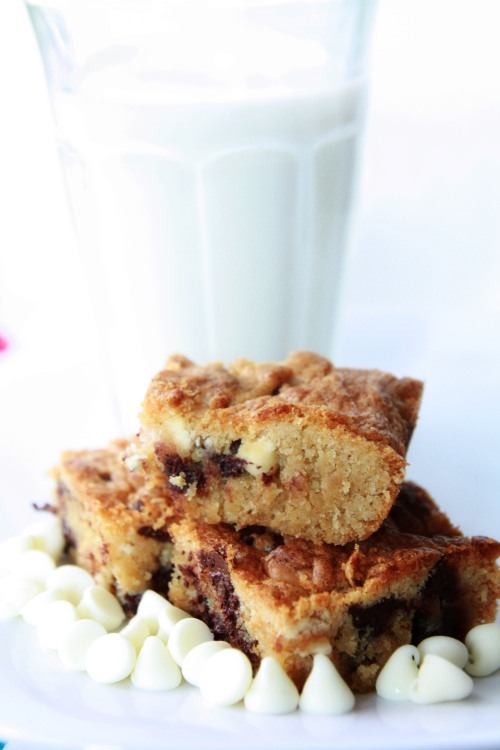
It’s so rare that I sit behind my home computer anymore.  Honestly, these days with work the way it is (insane), the thought of getting back onto a computer sounds about as appealing as having my head shaved. Thus the reason I stay away. Kind of sad actually, because I was given this recipe almost exactly a month ago. I know, I’m pathetic.

I finally give you….

Blondies.

1 ½ c. (7 ½ ounces) unbleached all-purpose flour
1 t. baking powder
½ t. salt
12 T (1 ½ sticks) unsalted butter, melted and cooled
¾ c. packed dark brown sugar
½ c. white sugar (a little shy of ½ c.)
2 large eggs
1 ½ t. vanilla extract
¾ c. semisweet chocolate chips
¾ c. white chocolate chips

Adjust oven rack to the middle position and preheat to 350 degrees.
Pan prep/trick for easy removal:
Spray 13 x 9-inch pan with nonstick cooking spray. Fold two 16-inch pieces of parchment paper or foil lengthwise so that one piece measures 9 inches wide and the other measures 13 inches wide.
Lay one piece along the length of the pan then the other one across the width of the pan. Make sure to press the paper or foil down into the corners so they lie flat. What you are going for is to have the pieces criss-crossed with rather clean corners in the pan . . . but with extra length hanging over each side. The extra length makes “handles” to remove the blondies after cooking and cooling. Spray the sheets with nonstick cooking spray.

Whisk the flour, baking powder, and salt together in a medium bowl. Set aside.

Whisk the melted butter and sugars together in a medium bowl until combined. Add the eggs (beat first) and vanilla and mix well.

Using a rubber spatula, fold the dry ingredients into the wet mixture just until combined. DO NOT OVERMIX. Fold in the semisweet and white chocolate chips and nuts, if using.

Turn the batter into the prepared pan, smoothing the top with a rubber spatula. Use the spatula to gently pull the batter into the corners and try to get a uniform thickness.

Bake until the top is shiny and cracked and feels firm to the touch, 22 to 25 minutes. Cool the pan completely on a wire rack. Remove the blondies from the pan using the foil or parchment handles and transfer to a cutting board.

Use a large bread or serrated knife to cut into 20 or 24 bars and serve. Hint: To have clean edges, you can use the knife to trim all the way around the bars before cutting into squares.

*Okay, I have to admit, I didn’t follow this recipe exactly. I used bleached flour and light brown sugar because well, I had them on hand. However, even though they tasted fantastic, they weren’t as great as my friend Mark’s version.  So yeah, you might want to actually use the ingredients that the recipe calls for. 

*Ps. I wish I could say I didn’t eat one of those blondies in the photo. Well, actually, technically, I didn’t eat one.  Nope. I ate them all.

Happy Saturday everybody!

13 Comments

Filed under kmslat, sweet nothings

Two New Recipes

As you know, things have been a little quiet on the blogging front for me over the past few months.   Work and life have been hectic and so I haven’t had as much time to spend in the kitchen baking fun, tasty things. The past three weekends I’ve actually been baking.  Now, they were nothing but whoopie pies, which I’ve made before, but hey, at least I’m back in the kitchen.  See, being in the kitchen does actually make me happy.

Exhibit A:

So that’s why I’m working on two new recipes.  I have to see which one suits me best, but it could be a few weeks before I know for sure.

In the meantime, here are the ingredients for both recipes:

Recipe #1:
sugar
spice
everything nice

Recipe #2:
frogs
snails
puppy dog tails


ps. yeap, that’s me.
at 17 weeks. but hey, how cool is my cooktop?
pps. ignore the ugly cabinets.

51 Comments

Filed under kmslat

Huevos Rancheros

huevos rancheros

I know, I know. Hell apparently has frozen over. I’m blogging! Crazy, right? Just know that I’m going to start making more of an effort. I promise.

Now, let’s get back to the food. If you’ve ever had huevos rancheros at more than one restaurant, you’ll know they never taste the same twice. They can include a multitude of ingredients. And be served many different ways. Since I’m too lazy to find out how you’re really supposed to make them, I went with a pretty fool proof recipe. I’m pretty sure this recipe isn’t exactly authentic, but you know what? When it tastes this good, I’m not too concerned about how authentic it is.

Huevos Rancheros
(serves 2)
Ingredients:
3 tbsp olive oil
1/2 medium onion, diced
12 oz ground chorizo (since I didn’t go hunting for chorizo, I used spicy Italian sausage, out of the case, diced into small chunks)
1/2 can refried beans
1/2 can fire roasted tomatoes (which you can find at any grocery store on the canned tomato aisle)
1/2 tsp kosher salt
4 corn tortillas
1 tbsp butter
5 eggs
1 tbsp milk

Additional:
sour cream
mexican cheese blend
(3 skillets)

The original recipe can be found here, on Life’s Ambrosia, but again, I switched a few things up.

To make:
Heat 1 tbsp olive oil in a skillet over medium heat. Add 1/2 of the diced onions and cook until softened. Stir in sausage/chorizo. Cook 5-7 minutes until sausage is cooked through. Stir in refried beans. Cook an additional 5 minutes. Reduce heat to low.

In another skillet, heat 1 tbsp olive oil. Add in remaining onions and cook until softened. Stir in fire roasted tomatoes and add salt. Cook for 5 minutes over medium high heat. Reduce heat to low.

Heat last remaining tbsp of oil in yet another skillet. Cook tortillas for 30 seconds on each side. Transfer to a paper towel lined plate. Once tortillas are cooked, drain oil from skillet. Melt butter over low to medium heat. Meanwhile, scramble up eggs using the tbsp of milk. Add to the skillet and scramble until eggs are done. Top with cheese and melt through. Remove from heat.

To assemble:
Place one tortilla on a plate, top with sausage/refried beans. Top with second tortilla. Add scrambled eggs. Spoon tomatoes over top. Add cheese and sour cream.

Enjoy!

24 Comments

Filed under kmslat

A Thanksgiving List

As we’re merely hours away from Eatfest 2010, I thought I’d throw a list up here. This time, for things that I’m thankful for…in no particular order. 1. Family. They may drive me bonkers, but I love ’em. And can’t imagine my nutso life without them. 2. The husband. Even though he technically falls into the family category, he kind of deserves his own mention. 094 3. Food. Because without food, this little blog would never exist. apples at farmer's mkt_edited-1 4. My pets (Gus, the cat, not shown). This is what I come home to every day. Doesn’t get any better than this. front door 5. You guys. Plain and simple I ♥ you guys. And if you’re wondering who you are, look at all of the links listed on this blog. You keep me entertained. You make me want to be a better photographer, a better cook, a better baker, a better home decorator, a better movie buff, and a better smart a$$. And each one of you guys has inspired me whether you know it or not. So thank you all. Now go enjoy this Thanksgiving eat-a-thon with your loved ones…(or the ones you barely tolerate).

8 Comments

Filed under holidays, kmslat

WTW – burger ‘n fries pot pie

So I have to apologize. I’ve kind of fallen off the face of the Earth. Between work, life, the sun setting far earlier, and my latest project, my attention and love and caring for yawyeor has kind of well, gotten lost in the mix. I’m hoping to step my game up again soon, but in the meantime, I will never leave you in a lurch when it comes to our dear sweet White Trash Wednesday.

Luckily for me, Beth from Happy Life Happy Wife sent me this pretty freaking spectacular White Trash recipe. Let’s just say it’s a spin on the old classic burger and fries meal you’d pick up at your local burger joint. And as much as you’re picturing it look like this, I assure you, it won’t. Because this is classy.
yeah! burger

And this…

is not.

Burger ‘n Fries Pot Pie

ingredients
1 1/2lb lean (at least 80%) ground beef
1 large onion, chopped (about 1 cup)
2 tablespoons all-purpose flour
1 can (14.5 oz) diced tomatoes, undrained
1 cup shredded Cheddar cheese (4 oz)
2 cups frozen crispy French-fried potatoes (from 20-oz bag)

directions
1. Heat oven to 450°F. In 12-inch nonstick skillet, cook beef and onion over medium-high heat about 8 minutes, stirring occasionally, until beef is thoroughly cooked; drain well. Sprinkle flour over beef mixture. Cook 1 minute, stirring constantly. Stir in tomatoes; heat to boiling. Remove from heat.
2. In ungreased 1 1/2-quart casserole, spread beef mixture. Sprinkle with cheese. Arrange frozen potatoes evenly in single layer on top.
3. Bake uncovered about 20 minutes or until potatoes are golden brown. Let stand 5 minutes before serving.

Original recipe can be found here.

(Big thanks to Beth for this oh so white trashy find!)

21 Comments

Filed under kmslat